-
iTop Easy Desktop - No.1 Desktop Organizer for Windows
-
Automatically organize and customize Windows desktop. Make your messy desktop look clean and professional within seconds.

How to Show Hidden Folders Windows 11/10 in 6 Ways 2026 [Easy & Fast]
How to show hidden folders on Windows? Discover easy methods to reveal hidden files and folders, plus the best desktop organizer to manage them effortlessly.
It happens. You open your PC and find that some files seem to have vanished. In many cases, it’s not gone at all. Windows intentionally hides certain files and folders to protect critical system data, configuration settings, and sensitive applications from accidental changes or deletion. So, how to show hidden folders in Windows? It’s not that difficult, as long as you know where to look.
In this guide, you can find several effective methods to reveal hidden folders, plus a smarter desktop organizer that makes file management much easier and more efficient.
If you want the fastest way to get started, File Explorer is your go-to choice. It’s built right into Windows, which lets you toggle hidden items in seconds. Here’s how to show hidden folders Windows using the feature.
Step 1. Press the Windows + E or click the folder icon on your taskbar. Open File Explorer.
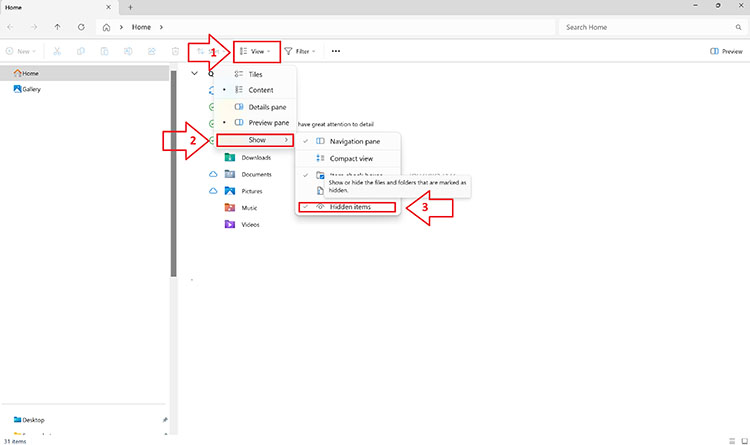
Step 2. For Windows 11. Click the View tab at the top. In the Show section, check the box for Hidden items. Hidden folders should appear as translucent icons.
Step 3. For Windows 10. Go to the View tab, then select the checkbox "Hidden items."
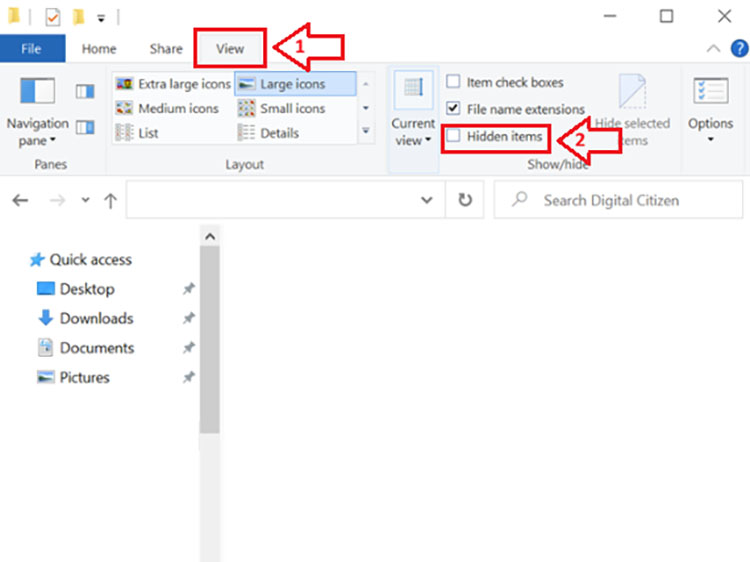
That’s how to show hidden folders Windows 11/10. The method works instantly for the standard hidden content. So, how to hide folders with it? Simply uncheck the box to show them!
The Control Panel is where Windows stores many of its deeper system settings. You can adjust how files and folders are displayed here. If you are looking for a more permanent solution for how to show hidden folders in Windows, this method is a solid choice. Once enabled, hidden folders will remain visible across all directories. Here’s how.
Step 1. Press Windows + S and search for “Control Panel,” then open the feature.
Step 2. Go to Appearance and Personalization, then locate and click the option Show hidden files and folders on the right side of the window.
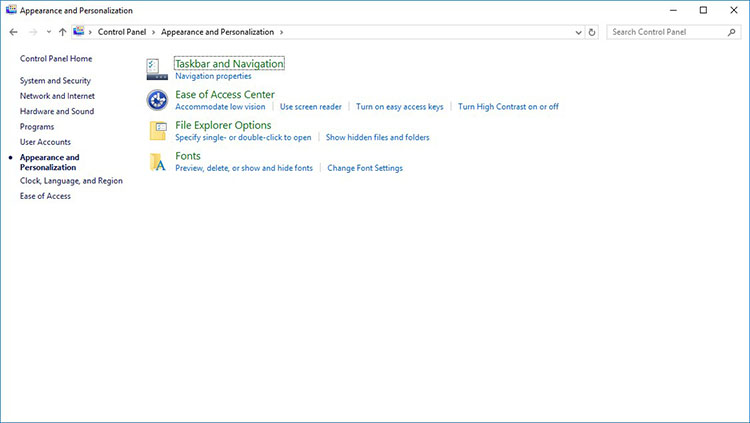
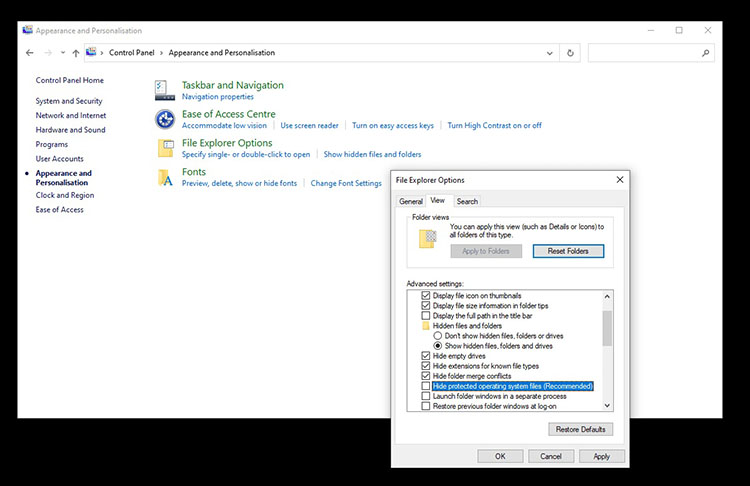
Step 3. This will open the File Explorer Options panel. Scroll down to the Hidden files and folders section, then choose Show hidden files, folders, and drives.
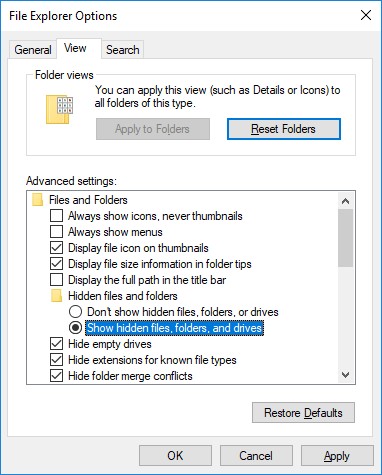
Now you know how to show hidden folders in Windows with the Control Panel. What about the other way around? It is worth noting that the Control Panel itself does not directly hide a specific folder. It simply controls whether hidden files are visible or not.
Command Prompt is a powerful built-in tool that lets you control your system using text-based commands. It supports advanced command adjustments, which is a great choice for users who want more flexibility in managing folder attributes and visibility. With Command Prompt, you can quickly view hidden files or permanently remove their hidden status, depending on your needs. Here’s how to show hidden files Windows with the Command Prompt.
Step 1. Type “cmd” in the search bar. Open Command Prompt with administrator, then right-click and select Run as administrator.
Step 2. Enter the command dir /a:h and press Enter. This will display all hidden files and folders in the current directory.
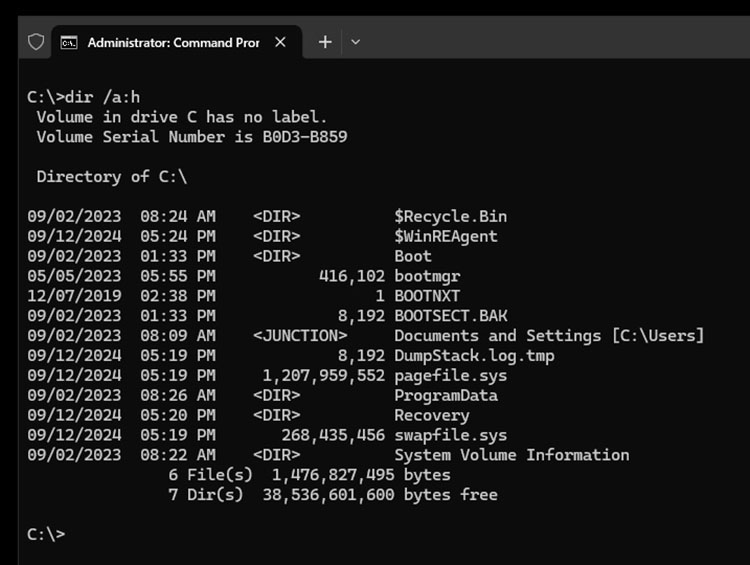
Step 3. If you want to make hidden folders permanently visible, type attrib -h -r -s /s /d C:\*.* and press Enter. This removes hidden, read-only, and system attributes from files. So they remain visible at all times.
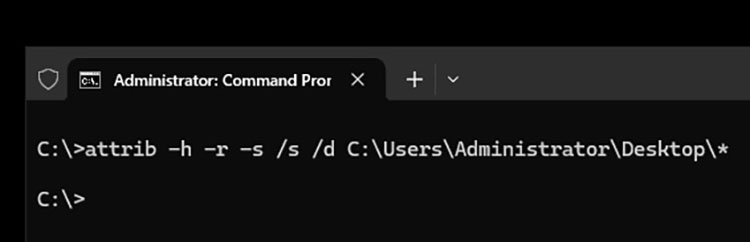
PowerShell is a more advanced and modern command-line tool compared to Command Prompt; it’s designed for deeper system control and automation. It uses structured commands (called cmdlets), which are powerful enough to manage files in bulk. Here’s how to show hidden files and folders using PowerShell easily.
Step 1. Right-click the Start button and choose Windows PowerShell (Admin) or Terminal.
Step 2. Use the command: Get-ChildItem -Force. PowerShell will soon list all the hidden files and folders in the current directory.
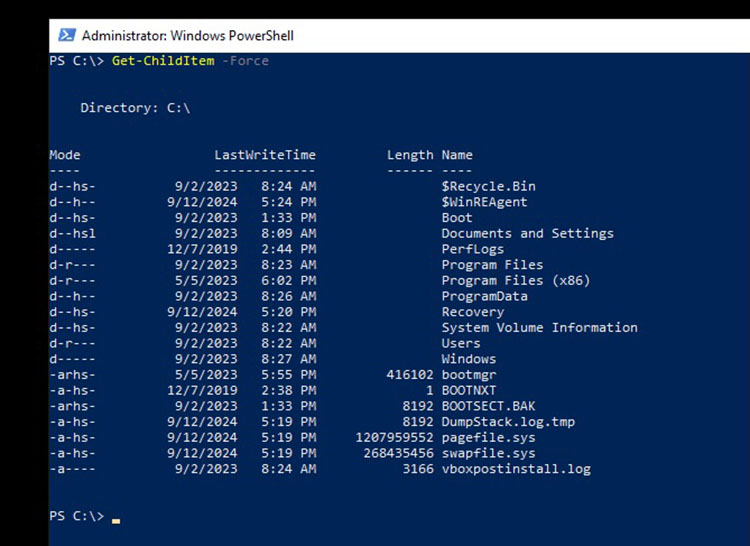
Tips: How to hide a folder on Windows with PowerShell? To unhide a specific folder, use the command: attrib -h "C:\Path\To\YourFolder". If you want to unhide all items in a directory, the command is: Get-ChildItem -Path "C:\Path\To\Folder" -Force | ForEach-Object { $_.Attributes = 'Normal' }
Beyond standard hidden files, Windows also protects certain “super hidden” folders. These are critical system files that are hidden by default to prevent accidental damage. They often include system configurations and core OS components, which is why they don’t appear even after enabling regular hidden items. So, how to show hidden folders in this case? Here are the steps.
Step 1. Open the Start menu, type Control Panel, and launch it. Then go to Appearance and Personalization, and click File Explorer Options.
Step 2. In the Folder Options window, switch to the View tab to access advanced visibility settings.
Step 3. Locate and uncheck Hide protected operating system files (Recommended). When the warning prompt appears, confirm by clicking Yes, then hit Apply and OK.
How to view hidden folder files on Windows 11/10? The methods above definitely get the job done. While some of them can feel a bit technical, some basic options often lack flexibility and customization. If you want a faster and more user-friendly way to manage visibility, iTop Easy Desktop is one of the best free tools you can try.

- iTop Easy Desktop
Next-Gen Desktop Customizer -
- 1-click organize 100+ icons
- 5000+ 4K and live wallpapers
- Interact with AI desktop pet
With its intuitive design and powerful features, you can quickly show/hide folders and files without system settings and complicated prompts. Now let’s see how to show hidden folders and icons on the desktop with it easily.
Step 1. Free download and install iTop Easy Desktop on your Windows 11/10 PC, then launch the program.
Step 2. Go to Boxes > Quick Actions. Tick the box for “Double-click blank area on desktop to hide and show icons.”
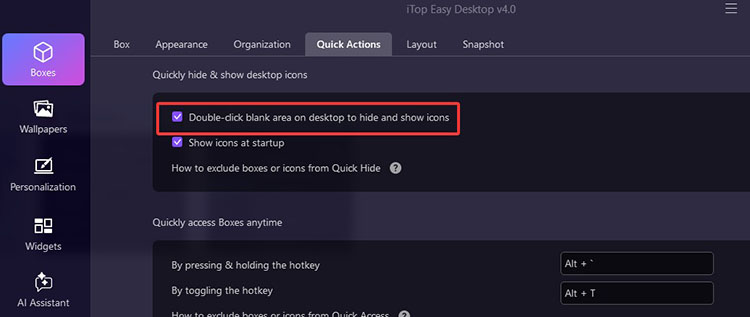
Step 3. Now you can double-click on any blank area on the desktop to view or hide your icons.
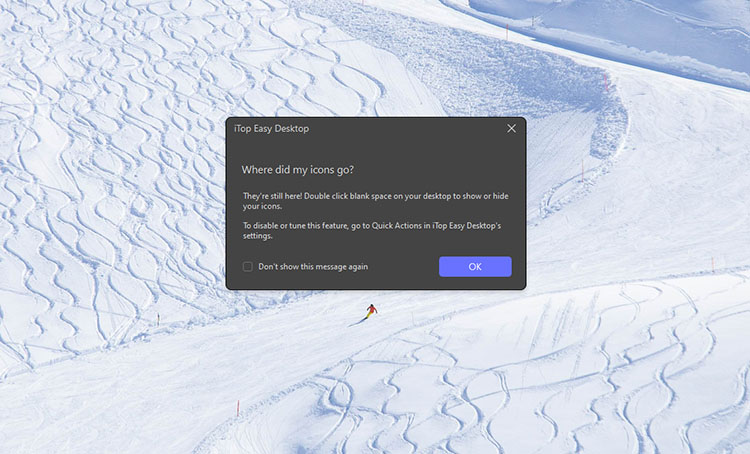
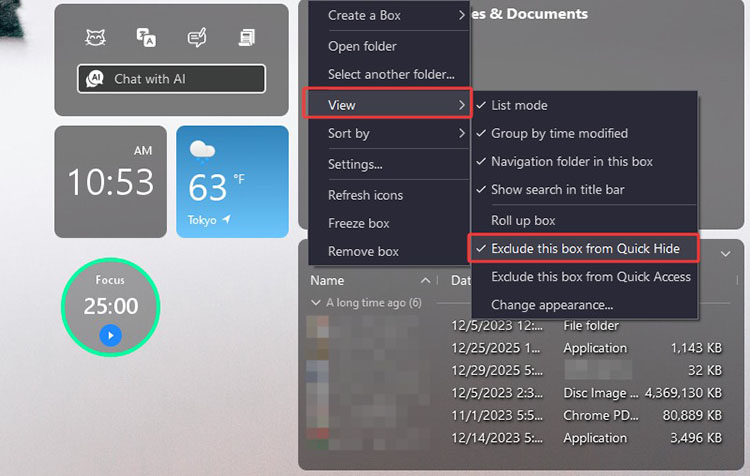
Step 4. You can also exclude specific items from Quick Hide, so they remain visible even when everything else is hidden.
To exclude a single icon, file, or folder: select it, right-click, then choose iTop Easy Desktop > Exclude this icon from Quick Hide.
To exclude an entire box: select the box, click the Settings icon in the top-left corner, go to View, and enable Exclude this box from Quick Hide.
Why Use iTop Easy Desktop to Access Hidden Folders?
Double-Click to Show/Hide Folders on Desktop
How to show hidden folders on your desktop easily? There’s no need to fiddle with settings. Just double-click a blank area on your desktop to instantly make all icons and folders appear or disappear. You can keep your workspace clean in seconds.
Auto Organize Folders/Files/Programs Effortlessly
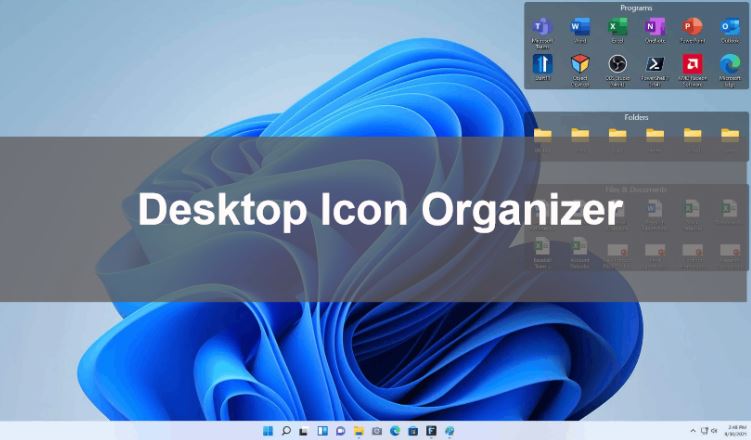
This powerful desktop organizer automatically groups your scattered folders, files, and programs into neat boxes. With just one click, your messy desktop turns into a well-structured layout, which makes everything easier to find.
Quick Folder Search & Smart AI Assistant
Equipped with Quick Search, this desktop organizer for Windows lets you locate files and folders in seconds. Plus, the built-in AI assistant provides an in-app chat box where you can ask questions or generate text, helping you boost productivity and streamline your workflow smoothly.
Aesthetic 4K Free Wallpapers for Windows
Enhance your setup with a wide range of static and live 4K wallpaper options. These high-quality visuals not only make your desktop look stunning but also perfectly complement your newly organized workspace.
Customized Desktop & Various Widgets
Its personalization features allow you to customize themes, the taskbar, and even the Start menu easily. This versatile desktop organizer also supports rich widgets. You can add a clock widget Windows 11 to check the time, or use a desktop calendar widget, iNotes, etc., to keep your schedule and tasks always within reach.
The Bottom Line
How to show hidden folders on Windows 11/10? You can easily use built-in settings and command tools to reveal hidden files whenever needed. iTop Easy Desktop makes things much easier. You can show or hide items on your desktop with just a double-click. On top of that, it offers smart desktop organization, powerful widgets, and rich customization features. If you want a more efficient way to manage your files, it’s definitely worth trying. Get it for free now!
- iTop Easy Desktop
Next-Gen Desktop Customizer -
- 1-click organize 100+ icons
- 5000+ 4K and live wallpapers
- Interact with AI desktop pet